Course website for CSSS508: Introduction to R for Social Scientists
University of WashingtonInstalling R and RStudio
This document walks you through installing R and RStudio on your personal computer.
In the instructions below, anywhere it says (version), there will be a series of numbers such as 4.0.4. The specific version does not matter, but we want to always use the most recent one.
Installing R
Windows
- Go to the Windows Installers page.
- Click
Download R (version)to download: Whatever version is listed will be the most current.
- Click
- Run the installer.
- If the installer asks, grant it administrative privileges to install.
- Follow the on-screen instructions.
- You do not need to change any default values unless you have a good reason.
- Once it completes, R is installed!
- There may now be R icons on your desktop or start menu, but we typically do not use R directly.
MacOS
- Go to the MacOS Installers page.
- Scroll to “Latest release”
- Click
R-(version).pkgto download: Whatever version is listed will be the most current.
- Run the installer.
- Follow the on-screen instructions.
- You do not need to change any default values unless you have a good reason.
- Once it completes, R is installed!
- There may now be R icons on your desktop or start menu, but we typically do not use R directly.
- Browse to the XQuartz download page
- Click
XQuartz-(version).dmgto download.
- Click
- Run XQuartz installer.
- XQuartz is needed to create windows to display many types of R graphics: this used to be included in MacOS until version 10.8 but now must be downloaded separately.
Installing RStudio
Windows
- Go to the Installers page.
- Click
Download RStudio for Windowsor, under All Installers, the link next toWindows 10/8to download: Whatever version is listed will be the most current.
- Click
- Run the installer.
- If the installer asks, grant it administrative privileges to install.
- Follow the on-screen instructions.
- You do not need to change any default values unless you have a good reason.
- Once it completes, RStudio is installed!
- We will use the RStudio icon to load RStudio and use R.
- Open RStudio and verify it loads.
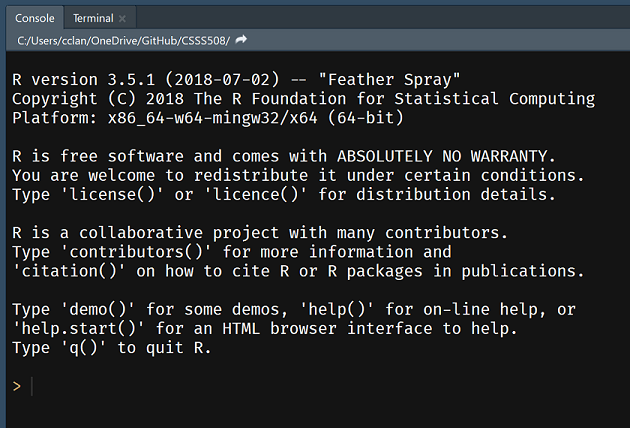
- In the bottom-left panel of RStudio, you should see something vaguely like the image at the end of this document.
- If there are any problems, email me at clanfear@uw.edu
MacOS
- Go to the Installers page.
- Click
Download RStudio for MacOSor, under All Installers, the link next tomacOS 10.13+to download: Whatever version is listed will be the most current.
- Click
- Run the installer.
- Follow the on-screen instructions.
- You do not need to change any default values unless you have a good reason.
- Once it completes, RStudio is installed!
- We will use the RStudio icon to load RStudio and use R.
- Open RStudio and verify it loads.
- In the bottom-left panel of RStudio, you should see something vaguely like the image below.
- If there are any problems, email me at clanfear@uw.edu
When you open RStudio, you should see something similar to this in the bottom-left:
If so, your installation was successful! If not, post on Slack or the mailing list.
